Thursday 29 November 2012

Dress Up Dolls

Hello

Christmas is almost here, I am so excited!  I have already shared with you the Princess and the Pea play set that I am making for my youngest - well it's almost finished.  So I turned my thoughts to what to give my eldest daughter.  I found this idea on pinterest (I love that site) I am tweaking it slightly but very excited about it.

image here


Using these gorgeous free prinatbles I will be making a traditional paper doll but with a twist.  I'll be printing them onto magnetic card which you can then cut to size.  Then I'll put them into a tin (I am wondering if they would fit in an Altoids tin) or a tin pencil case.  So my girls will be able to take her dress up dolls where ever she goes.  My eldest is developing quite an eye for vintage style - like her Mummy.  I love clothes from the 40s and 50s but I don't dress my girls in vintage styles as I think its not fair to push your own personal style onto your children but actually My eldest often chooses these styles.  I think this set will be just her thing!

image here

Tuesday 6 November 2012

Steam through your cleaning

Hi, I thought I'd drop by and share with you all a little cleaning tip and some of what I have been up to this week.

My microwave was filthy after a little tomato soup explosion - think there might have been some custard clinging in there too, oh the shame!  Anyway I started scrubbing away at it with a little warm soapy water, it was kind of tough going so I had this idea.  I put half a pint of water in a jug in the microwave & put 5mins on the clock.  My microwave got nice and steamy, the dirt loosened & all wiped off in an instant.  Easy a nice clean fresh microwave with nothing more than soap and water.

As you are probably aware this Sunday is remembrance Sunday.  I decided to knit some poppy's for my girls using this very easy pattern from Bebere.  My 2 year old manages to keep a paper poppy in one piece for about 2 minutes and we've had the stickers previous years but they can only be worn once so this year my girls can be wearing their poppy's with pride all week.

image via Bebere
Now I am off to put the cosy-toes on the pushchair ready for our afternoon trip up to school.  It's very chilly out today, stay warm and have a great week!

Sunday 28 October 2012

Hair cuts

The average woman spends in excess of £400 per year on hair cuts!  I spend £208 per year on hair cuts for my whole family and below I will share my secrets. 
 

I go to a salon for a wet cut every 5/6 weeks.  I think a good hairdresser is essential for women & I fully accept that hairdressers have years of training & experience behind them & if you want a great hair cut this is the place to go.  A wet cut is a hair cut without the blow dry although, my very kind hairdresser does rough dry my hair for me so I don't leave the salon with dripping wet locks. This is significantly cheaper than a cut and blow dry.  I just ensure I have my hair cut last thing when I'm out and that I have time to zip home and dry it properly.  If you have long hair bring a hair tie and plait your damp hair for nice loose waves.  

However when it comes to simple cuts hair cuts why not do it yourself?  After all you wouldn't think twice about cutting your nails at home.  I cut the girls hair myself and my husband cuts his own hair.  In order to do this yourself you will need to invest in a few tools we bought this kit several year ago and it has paid for itself several times over already.  My husband uses the clippers to cut his own hair & I trim his neck and around his ears when he's done.  The kit comes with some proper hair dressing scissors which I use to do the girls hair.  Special hair dressing scissors are essential for cutting hair - don't attempt to use your kitchen scissors or paper scissors you will not get very pleasing results.  Keep your hair dressing scissors nice and sharp for best results.  I also bought some of those clips hairdressers use to section you hair when cutting it in the salon - these are widely available from chemists & supermarkets.  I am no hair cutting expert but here are a few tips I have picked up along the way
  • Cut hair when it's wet - it is easier.
  • Start at the front to get the lenght you want and then work towards the back.
  • Don't just cut through hair in a straight line take a small section and run the comb through it.  Pause about 1/1.5 inch from the end and trim to the desired length.  Comb through to the ends but keep holding the section of hair.  Flip the hair upwards so the ends splay out and, with the scissors make  quick, shallow snips down into the hair to soften the blunt ends.
  • Cut lower sections of hair fractionally shorter than the top section to avoid hair looking too thick. 
  • In order to ensure the same lenght all the way round.  include a small piece of already cut hair from the previous section in your new section of hair.  Use the already cut hair as a guide being careful not to cut it again.
If the above technique sounds a bit daunting for your 1st attempt try this.  Take a small section of hair and twist it from the top to the bottom this will make the ends splay out (this technique works really well for tidying up split ends between cuts at the salon.  I am told models use this technique to keep their hair looking sharp & freshly styled all the time) trim the ends to the desired lenght, continue like this all the way around.


My best tip is go at it with confident!  I often get half way through & start worrying that it's going to look bad but once I've checked it over and tidied it up at the end it looks great.  It really isn't too hard - I've not had any disasters yet! 


Tuesday 23 October 2012

Thrifty Tips on Exercise

Hello

Wow, it's been ages since I last posted I'll make no apologies for the fact that life took over, I got busy & blogging was not high up on my list of priorities.  But now the evenings are drawing in and I have my eldest settled at school I have found my mind returning to blogging.  I started this blog because I wanted to do something for myself.  I felt as thought I had lost my own identity in being a wife & mother lately those feelings have crept back in so having just finished a 20min work out (another little resolution I have made for myself) I thought, why not write one of those blog posts that has been rattling around in the back of my head for a while.  

Let me tell you more about my new exercise program - ha ha that sounds so regimented.  Before Child (BC) I used to do an exercise class once a week aerobics or Pilate's and lead quite an active lifestyle.  I am naturally, by virtue of good genes, very slim (a little too slim if I’m honest) and then after 9months of awful morning sickness with my 1st child I was very very very thin & not in a good way.  I was too afraid to exercise in case I lost yet more weight - which I just couldn't afford to do.  I know its a problem most Mums' would kill for but trust me its not pleasant & I am convinced just as bad for my health as being over weight.  I thought that all the running up and down stairs after children & weight lifting with a toddlers & school bags would be enough to keep me fit.  However, after several years of no proper exercise my limbs started to feel weak.   

some lovely 1950s ladies working out.

  I decided I needed to tone up but how do you get to an exercise class with children in tow or when you are shattered in the evenings.  Oh & of course I can't afford an exercise class anyway.  So after giving it some thought & armed with nothing more than a yoga mat & a laptop I tried to find an exercise program that would work for me.

I quickly settled on Pilates as my ideal exercise method - all about muscle strength and core stability rather than fat burning. I also decided that I needed to be realistic about how much time I would have for exercise & when I could fit this into my day. 20mins during nap time seemed achievable so, I fired up youtube  typed in "20 minute pilates workout" and I found a great video straight away!  I have been using it ever since.  I have dug around on youtube for other videos' and found searching by the time you have available "5/10/20/30 minute" yields great results.  I have already noticed the benefits too I feel my posture improving & I feel energized after my workouts.  As if that wasn't good enough as I boasted to my husband the other day I can now snap off the excess stalks on the Broccoli in the supermarket!  What a thrill!  So not only am I exercising for free at my own convenience I am saving money on broccoli as a result lol.

Should you need a little more motivation than my wonderful Broccoli experience (snigger) can I recommend following my friend Marion on twitter.  Marion is a personal trainer and re-tweets lots of interesting articles & motivational tips - I thoroughly recommend her.  

Tuesday 21 August 2012

Sewing lavender bags with children.

It has become a little tradition in our house that once potty training is going reasonably well we make lavender bags to perfume the draw we will need to clear to make way for the big girl knickers.  I like to involve the girls in this as much as possible.  I thought I would share this project with you since it is so very child friendly and quick it makes a great first project. 

Let your child pick some fabric - this is an ideal project to use up scraps.  You can use the chosen fabric for both sides of the lavender bag or use a plain piece for the back.  For each lavender bag you will need to cut two squares.  I use a CD case as my template.  Pin three of the sides together right sides facing.

My girls like to pass the pins to me when ever I do any pinning.
 Stitch around the edges of the bag pivoting around the corners and leaving the final edge undone.  In a project like this where seam allowance is negotiable but, you want nice crisp straight lines.  I have two tips for sewing a straight line.  Don't be embarrassed sewing in a straight line is a challenge even for experiences sewers.

Tip one align the edge of your fabric with the edge of your sewing machine foot and keep this alignment to ensure a straight line (so long as your fabric is cut straight).
Tip two using a fabric marker or even a pencil if you don't have a specialist fabric marker draw a straight line with a ruler where you want to sew.

The age and temperament of the child will dictate how involved in the sewing process they can be.  You will be the best judge of this but this is how it is for my girls.  My youngest who is 2 is a very curious and hands on little mischief maker.  I have only just let her start to sit on my lap whilst I use the machine and occasionally let her press the reverse button.  She does love to watch the sewing machine in action and sat whilst I sewed two or three of these little bags.  My eldest who is 4 has always been a very sensible and cautious child.  She has been sitting on my lap whilst I sewed since she was a baby and I never worried she would try to touch anything she shouldn't.  Now I let her guide the fabric through the machine with my hands on top of hers.

This is how I do a lot of sewing - just as well I have long arms.
 Now you have a bag with an open top.  Clip the corners and turn right side out.  Normally I would press these now but you can skip this process if you are making these with children.

Add 3-4tbsp of dried lavender to the bags - this is where children of any age can really get stuck in.


Fold over the raw edge of the bag about 1cm and secure with pins.  Now sew the opening closed using the sewing machine.  If you want a more professional finish press this edge over and slip stitch the opening closed.  Your done!

In true blue peter fashion here is one I made earlier.
Now if only potty training was this simple ;)

Sunday 19 August 2012

Somewhere Over the Rainbow...

Today would have been my Grandma's 94th birthday.


I am who I am because of her.  My Grandma loved to sew, knit and cook, kept a rose garden and collected tea sets.  She could never be idle and always had to be doing something.  She adored babies and sang songs from old movies all the time!  Does all this sound familiar?  She shared all these passions with me when I was a child and now I have grown to love them too.  I take enormous pleasure in sharing these joys with my children and live in hope that I may one day share them with my own grandchildren.

May I encourage you to share your passions with your family.  I was just 14 when my Grandma died and yet I know I am who I am today because of the time I spent with Grandma.   

Little House on the Patio

Hello!

I thought I would drop by briefly to fill you in on more of our summer.  Those of you who follow me on facebook will know we have had some excitement here.  Last weekend we collected a second hand playhouse from good friends of ours who are moving and who's kids have outgrown it.  I confess when I found out our friends were moving and not taking the play house I jumped in very quickly and asked if they would mind if we took it - sometimes you just have to put yourself out there!  Amazingly our lovely friends said as long as we did all the disassemble & moving we were welcome to it.  The girls and I were very excited and my eldest quickly began choosing paint and co-ordinating soft furnishings - she's 4 but already has a very strong nesting instinct!

The playhouse was not in a bad way apart from the windows which were broken and the perspex had gone cloudy.  We replaced these, tidied up each panel - making several thousand spiders homeless in the process.  Finally we gave it a fresh lick of paint and new curtains it looks as good as new.   I painted the playhouse inside and out.  A sweet pink on the outside with contrasting white trim.  Inside I painted the panels white.  Our garden does not get much sunlight so I felt a fresh white finish would keep the playhouse light and airy all year round.


As you can see I made the girls pitch in and work pretty hard on this project.  I was keen to teach them that in life when we want something we have to work for it.  Furthermore that sometimes it is more enjoyable to take something old and a little rough around the edges and make it new again.  I had them sanding panels, prime-ing and painting.  Even my two year old!  I am still trying to scrub the paint off her little hands.  It was a great feeling that we were all pulling together, united, working towards a common goal.  That being said you have to be realistic my girls are 2 and 4 &  maintaining concentration on one project, having your parents constantly busy and waiting for your play house to be built for a whole weekend is probably testing enough.  I worked solidly on this project utilising every moment of my time to get this project done.  Half an hour before church I was priming a panel.  All through nap time I slapped paint on as fast as I could.  Most of this took place on our front lawn which is significantly larger than the side garden where the playhouse now resides.  Our neighbours watched on with great interest as I toiled away.  We had several of them come and inspect the finished article throughout Monday & all seemed utterly smitten. 
Come Sunday evening every panel was finished & whilst I put the girls to bed my husband (who has been extremely understanding about having a pink house plonked on his patio) began assembling it.


I am so pleased with how our house turned out.  We have named it Bethany House after its former owner.  Also because we discovered one meaning for Bethany is "with red hair" which my eldest daughter has so it really seemed to fit.

On Monday morning at 8:30am my girls went into their Bethany house they had been talking about having breakfast in there the night before but they instantly fell to playing.  An hour later I decided they really ought to be hungry so took them their breakfast which they had not once asked for.  They played so nicely all morning in their play house that by lunchtime I had made 4 curtains and a cushion.  In the afternoon the girls helped me plant geraniums in pots outside the Bethany house.  We went out briefly to buy food and all they talked about was their play house.  When we got home they were back in their playhouse before the shopping was out of the car.  Needless to say getting them in for bed was tricky too.  On Tuesday we had a play date and our housewarming party.  We served french fancies and a great time was had by all.  On Wednesday the little house became a shop for the morning and later a cookery school.  And so it continued for the rest of the week the novelty has most certainly not worn off & both girls seem genuinely proud of their little house on the patio which they know they helped make happen.

Friday 10 August 2012

Christmas

I know many of you will have choked on your cup of tea just reading this tittle and I apologise if I have offended you BUT my biggest and best tip for you if you want to save money on Christmas... start thinking about it in July.  
My first port of call is the dotcomgiftshop sale this little online gem is always great value for gifts for all but their sales are amazing!  I am afraid you have missed it for this year but it's still worth checking out for lovely gifts.
I like to make many of my presents and this takes time.  Hampers make a lovely gifts at Christmas so once again I urge you to get your preserving pan out and make the most of the summers bounty.  Home made jam on toast in front of the fire at Christmas time, a sharp chutney to temper your Christmas cheese platter or a fruity liquor to toast the new year.  Make them now and then have fun making them look really special once the cold weather kicks in. 
If you follow my blog you'll know I love to sew even not more than I love to make jam.  This year I am making the beautiful Princess and the pea toy from the last issue of Mollie Makes.


 Isn't it adorable?!  You can read about this project and see more pictures on the designers website here.  I am making this for my youngest daughter complete with a little bag to keep it all together and hope to find a beautiful copy of the story to really set it all off.  I am really excited about this project.

I have also been picking up old vinyl records at charity shops and have plans to turn them into funky presents.  Another thing I have been on the look out for in charity shops are pretty pieces of china and glassware these make pretty, useful and different gifts for women of all ages.  

I hope you can begin to appreciate why I start my planning 6 months in advance I confess that in part I am a control freak and dislike leaving anything to the last Minuit.  I love to lavish time on the gifts I give and give something original.  Also by making a couple of gifts each month it spreads the cost. 

Sunday 5 August 2012

Fruity

Hello Readers

Its been a while since I last posted.  Life was tremendously busy in the run up to the end of school term & I also had the heaviest cold I've ever had and broke my toe.  There just didn't seem to be enough hours in my day.  But now the school holidays are in full swing and I wanted to share with you what we have been up to in the kitchen.

Do you remember a couple of months back I reminded you to start saving your jam jars well I am working my way through my stash already.  Those of you who live in the countryside may be familiar with the scenario of coming home to find punnets of fruit or fresh vegetables left on your door step by kind friends and neighbours who have more produce than they know what to do with.  I think the strangest thing I have ever found on my doorstep was a large crate of fuzzy quinces and a handful of runner beans.  Lately I have been given a punnet of redcurrants and a punnet of blackcurrants.  Another way to get hold of inexpensive fruit and veg is to visit your local market or farm shop or even the supermarket at closing time.  If the weather has been especially cool or wet - which it has been for months here - this technique of bargain hunting works particularly well.  Last week I also picked up some raspberries very inexpensively.  I made a raspberry and redcurrant jam and a blackcurrant one too.


With my eldest off to school in September my thoughts are also turning to cheap and nutritious packed lunches (school dinners at our local primary are schockingly unhealthy).  I have made several batches of cordial to pep up her water bottle.  Whilst I try to encourage my children to drink water as much as possible we all like something a little fruity.  I won't buy squash I either dilute pure fruit juice or give my girls home made cordials that way I know exactly what's in them.  Another great idea for school lunches and snacks is to make fruit leathers.  Fruit leathers are like those fruit winders you can buy.  You can use any fruit but soft fruits and berries work particularly well.  Stew them with as little added liquid as possible.  Strain the fruit through a sieve to remove stones or pips.  If you wish to add sugar now is the time to do this use icing sugar as it dissolves easily.  Now spread this mixture thinly directly onto a baking sheet and put into the oven on the coolest temperature your oven can do and cook until you have a flexible sheet, this will probably take several hours.  Cut into strips and store in an airtight container.  So easy and so much cheaper than anything you can buy in the shops!

At this time of year it feels as though there is always something happening in my kitchen.  The area I live in is famous for its orchards so in late summer and Autumn there is an abundance of orchard fruits to preserve in all manner of ways.  I hope to bring you more on this topic and a wonderful high dumpsey deary jam recipe.

Monday 16 July 2012

Get sewing for free

When I first started to sew seriously I turned to the Internet for ideas and inspiration.  When you are learning you don't want to spend money on a book or pattern that are beyond your skills.  Sewing patterns can be expensive and rightly so there is a lot of work goes into many of them.  At first I found it hard to find what I was looking for.  I think because most free patterns and tutorials come from blogs search engines do not seem to find them.  Slowly but surely my bookmarks list began to grow with useful little sites.  So I thought I would share the ones I use most often with you in the hope that it might save you some time and inspire you to dig out your sewing machine.  After all if it is going to rain all of July you might want a project to entertain you.

Craftiness is not optional
A note about Internet patterns.  Most free patterns are in PDF format.  These patterns need to be printed out and pieced together - follow the instructions with the pattern.  It's then best to trace them onto dressmakers tissue of backing parchment (if your thrifty like me).  Don't be put of by this it can be fiddly and time consuming but worth it for a pattern you love at no cost.

Often with these sources there is a lot of cross over some of these sites will have ladies, children's and home sew projects but I have grouped them here according to what I mostly use to them for.

Image via Horrockses fashions
Ladies patterns are not bountiful but they are out there if you know where to look 
Horrockses fashions are releasing a series of vintage dress patterns designed to be made using their bed linen.  The first dress is a very wearable and simple strappy sundress.
Burda style is a lovely magazine that on the surface looks like a glossy fashion magazine but in the middle are all the patterns to make everything you see, it's my idea of heaven!  They also have a website which provides a kind of social network for garment sewers.  Once you have an account you can upload projects and pattern reviews, download patterns - quite a few are free - and advertise sewing groups.
Colette is an Indie pattern company that produce really lovely and good quality sewing patterns.  Colette patterns are modern classics's and such a refreshing change from the dated patterns most of the traditional pattern houses produce.  Colette patterns will truly inspire you to sew and are at the forefront of reviving sewing as a hobby.  Their website and blog is full of amazing inspiration and tutorials and the free Sorbetto top pattern.  Don't be fooled by the simplicity of this little top a quick Internet search will give you a wealth of ideas for how to produce your own sorbetto top for a start check out sew weekly's 7 days of sorbetto.


 There is a wealth of amazing free children's patterns although a definite bias towards girls clothing.  Sewing children's clothes is so quick and rewarding its a great place to start learning to sew.  Check out the 100s of free patterns and tutorials from prudent baby and the amazingly creative sisters over at Shwin & Schwin. If your still hungry for more check out me sew crazy for lots of tutorials and craftiness is not optional.  There are literally hours and hours of exploring, reading and sewing to be had here. 

Purple potluck bowl covers

If home sewing is more your thing then try sew mama sew for home sew tutorials and a lot more besides.  Also the visually stunning cottage home.  If you are new to sewing I guarantee a name you will quickly stumble across is Amy Butler this fabric designer is a big name in the sewing world producing very modern quilting fabrics that are widely available.  She also designs patterns, wallpapers and stationery.  Click here for a link to some free PDF patterns produced by Amy Butler.

Friday 6 July 2012

Ikea Hackers

Hello Readers

I recently discovered this site called Ikea Hackers its nothing sinister but an amazing site where people from all over the world post unusual or alternative uses or modifications for Ikea furniture.  I wish I had found this site sooner it is amazing. 

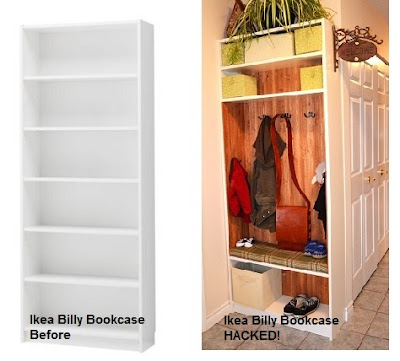
by Country Roots Early Learning Centre, Ayr Ontario via ikeahackers.net

Above is my favourite billy bookcase idea - i really want to do this!

I thought I would share a little round up of some cute kids play ideas I found.  A year ago I wanted to get a play kitchen for my girls I searched high & low for an affordable option that wouldn't take up my entire living room - well plenty of that at Ikea hackers.

I thought I'd kick things off with this pretty pink option - so pretty!


This darling country kitchen for a little girl is by mali-mo via Ikea hackers she did it all herself and used an Ikea box as her base and other bits of pine offcuts and old knobs, isn't it amazing?


This option I really like as it has toy storage underneath its made using the Ikea TROFAST and Jan has used vinyl to make the kitchen on the top.

There are lots and lots of play kitchen's on Ikea hackers and lots of LEGO play tables too.  My favourite is this one, a very smart way to keep the LEGO off the floor


Vicky B used a LACK side table, TROFAST box and lid to make this table.


Heathur Dollar used 2 LACK tables and this Ikea car mat to create this great play table, so easy to do and looks such fun. 

I could go on and on but I think you get the idea.  As you can see lots of eye candy and smart ideas to be had at ikea hackers it's all neatly arranged room by room.  If you are struggling with re-creating a particular design or furnishing a tricky area in your home chances are someone else has had the same problem or idea and you might just find it on here.


I inadvertently "hacked" a Hemnes bedside table a few years ago.  I liked the elegant lines of this bedside table but didn't like the colours.  I was at the time in love with the beautiful mirrored French bedroom furniture that was all about but very expensive.  So I took my Ikea bedside table and sanded it down, I primed and then painted the table a lovely green to compliment the dusky pinks of my bedroom.  I then found a glass supplier and got them to cut a piece of mirror for the drawer front and a piece of toughened glass to fit the top.  I wallpapered the top of the table and used little rubber dots to cushion the glass which just sits on the top.  I replaced the handle too.  It wasn't desperately thrifty to do (I’ve done cheaper furniture re-do's) but compared to buying something this pretty I certainly saved ££.

Before...
and after.